Thursday, October 30, 2014

Lastest Pattern Teaser


A little teaser for you of my latest pattern. Currently in the typing stage of this one, and hopefully I'll be able to reveal the subject matter soon! Just got to make sure that the plush arrived at its new home first. Don't want to spoil the surprise for anyone!!

On another note, it's Thursday! Which is my version of Friday! Happy Frithursday!!

Wednesday, October 29, 2014

A Day of Canning


Last week I had the honor to share the kitchen with two very talented women: +Pyper Jean, my dear friend, and Barbara Salsbury from Solutions for Preparedness. On a day that Pyper and I were supposed to spend making our planners for next year, we ended up having an all out can-a-thon and calling Barbara over to assist.

Both Barbara and Pyper have been canning for years and years and years. While both my Grandmas can from their gardens, their productions are not on the scale that Barbara and Pyper undertake. That is, my Grandmas haven't canned on this scale during my lifetime. So, seeing what we could put up in just one steam-filled day (and knowing that Pyper never sleeps and has been canning stuff each week since about June) was astounding to me. It still blows my mind!!

Last in Line: Grape Jelly
Grape jelly!! That actually jelled!!
We started out with beets and ended up with 8 1/2 quart jars. Though I'm not fond of pickled beets, Pyper's grandma's recipe sure did sound interesting. It involved cloves. I'm not sure whether my Grandma uses cloves in hers, but like I said, it was interesting.

After the beets were done, I thumbed through Pyper's canning book for a while. I found a recipe for "Thanksgiving" jelly: apple, raspberry, cranberry. Well, there were raspberry bushes and apple trees in the yard, and Pyper just happened to have a bag of cranberries. We set out and picked raspberries and apples and canned that jelly fresh off the vine/tree. What an experience!! And I tell you what, that stuff smelled SO AMAZING. Like tart, cinnamony, holiday cheer. We got 8ish 1/2 pints of that yumyum stuff.

Next up was grape jelly. That's where Barbara came in. She and Pyper have known each other for quite some time. Since Barbara literally wrote the book on canning, Pyper enlisted her to help make sure the grape jelly actually jelled: something I also struggle with. Syrupy jelly. Runny jelly. Apparently, the trick is you add lemon juice and pectin and BAM. Thick, gooey, jelled jelly. Who knew?! Well, Barbara did, apparently.

And you have to boil it until, "it looks like it's going to turn into hard candy!" Stir constantly. Like, constantly, constantly. Like, don't stop stirring while someone takes your picture, constantly.

Last in Line: Making Jelly with Barbara Salsbury
Me stirring under the supervision of Barbara
I don't remember how many pints we got of grape jelly, because we had a lot of odd shaped jars that we used. I do remember that our one batch was the exact perfect amount to fill up all those oddball jars. Amazing!!

After jelly, it was time for tomatoes. We blanched, peeled, stewed, and canned 8ish quart jars of 'maters. We has some tomatoes set aside for tomato basil jam. Unfortunately, we were completely out of sugar so the jam had to wait for another day.

Last in Line: Canning
My haul. Yumyumyum.
Pyper stopped over on Sunday to drop of my haul of our canning adventure.  I am beyond excited to have such a full pantry!! I feel like such the little homesteader. I cannot wait to get out of apartment living and into a house so that I can have my very own garden yet again. Siiiiiiggghhh.

I just love self-sufficiency.


Tuesday, October 28, 2014

How I Write Crochet Patterns


 I'm working on a new crochet pattern right now, and it's really striking me that I have a very specific (read: obsessive compulsive) method for pattern writing. It's always amazing to me the way the mind works in regards to creative projects, so I thought other people might find the inside of my brain interesting. So I'm going to share!

I learned how to draft sewing patterns once, and the process was mind boggling. Perhaps because I am more used to working directly into a 3D form, as opposed to working first on a flat form (the paper) for sewing patterns making. Or perhaps it was just because I have been working with crochet patterns longer than with sewing pattern. Whatever the reason, I am much more comfortable designing my own crochet projects.

It has gotten to the point, in fact, that I can't handle reading other people's patterns. I love designing patterns so much, that even when I'm using someone else's pattern, I'm writing my own notes and alterations. It's a problem. I can't help it.

If you are a designer and have your own process, I'd love to hear about it. Like I said, I am very intrigued by the creative process, ya know? So, without further ado, here's how I hammer out my crochet patterns:

Step 1: Inspiration & Sketching
Pretty much just like the title says: I get inspired and do some sketches. I plan out how the item will
be constructed, right down to the location of the starting round for each component. I will sometime do an image search to find real-life references for costumes, shapes, and anatomy. This usually takes about 20 minutes, but I've spent as long as 7 hours on this step.

Step 2: Making the First Version
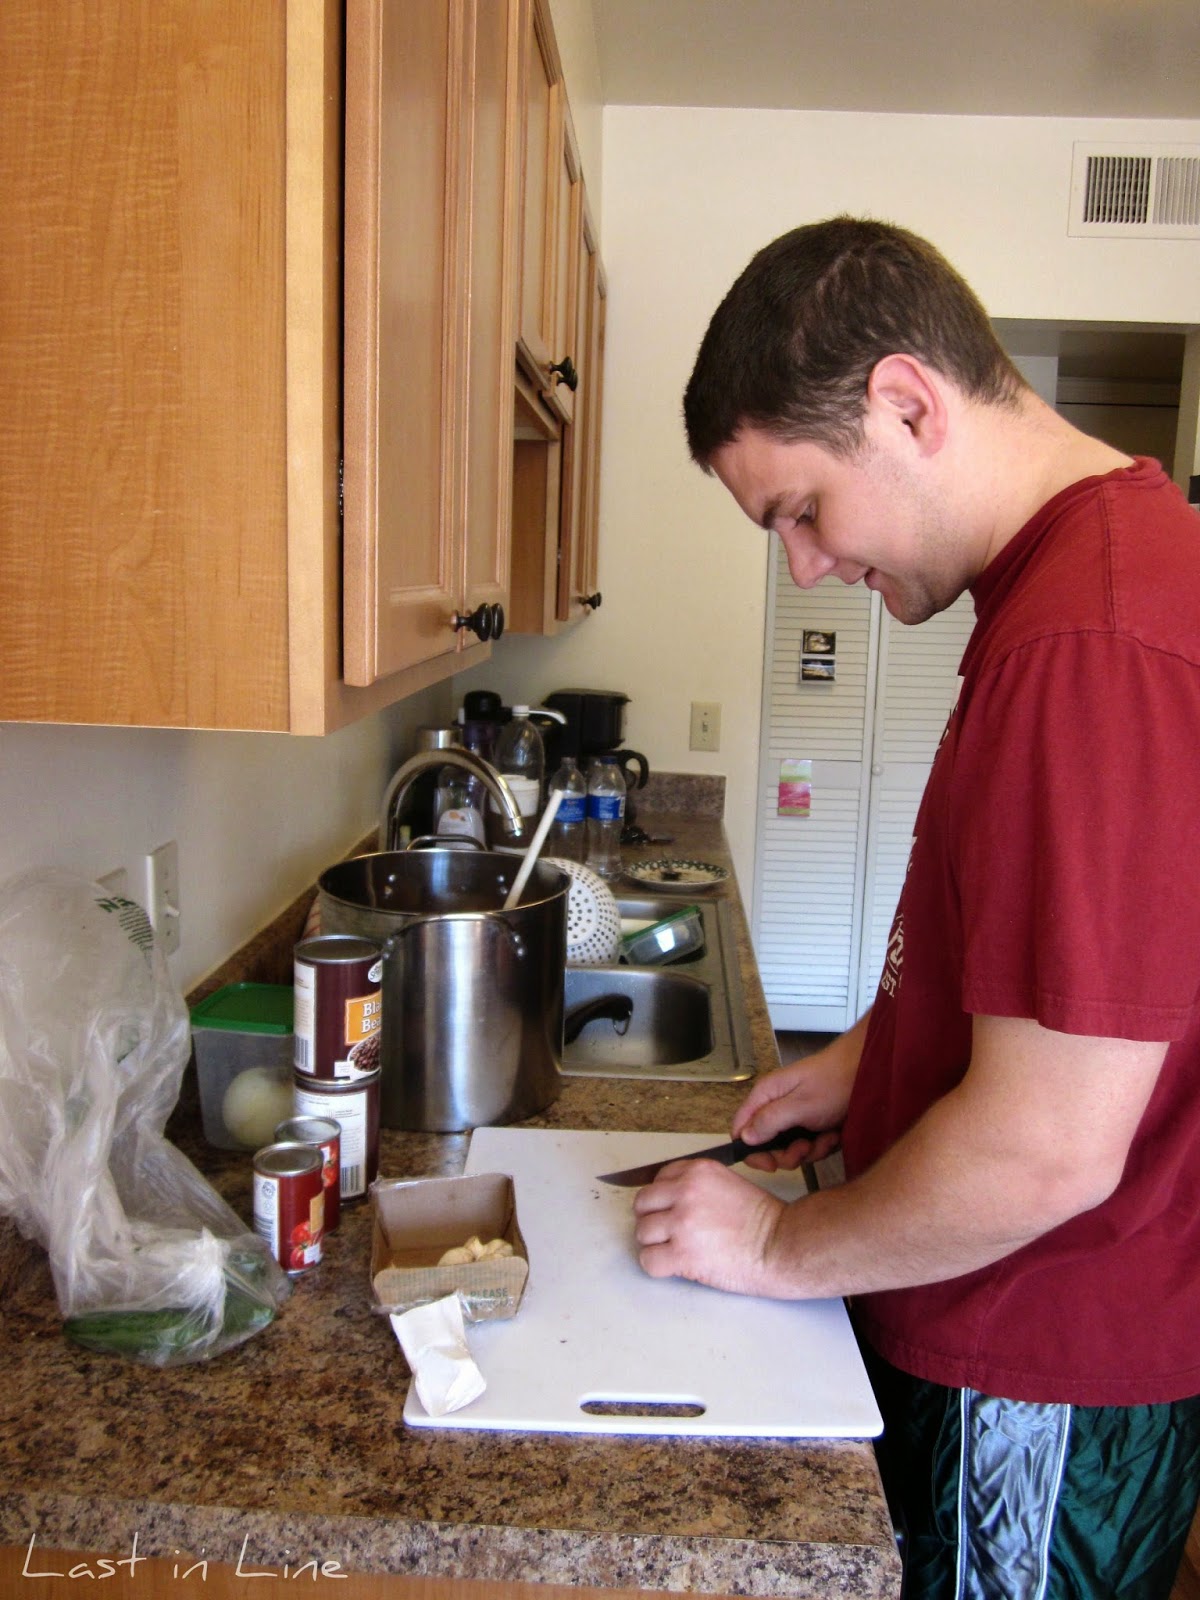
This is by far the most time consuming step. I cannot write down part of a pattern without actually stitching it out as I write. I know there are some people out there who can actually draft a pattern without actually crocheting as they go. I enjoy crocheting it as I write. It gives me a chance to experience what the readers of my pattern will experience, and a chance to see if any section is ridiculous or annoying or hard.

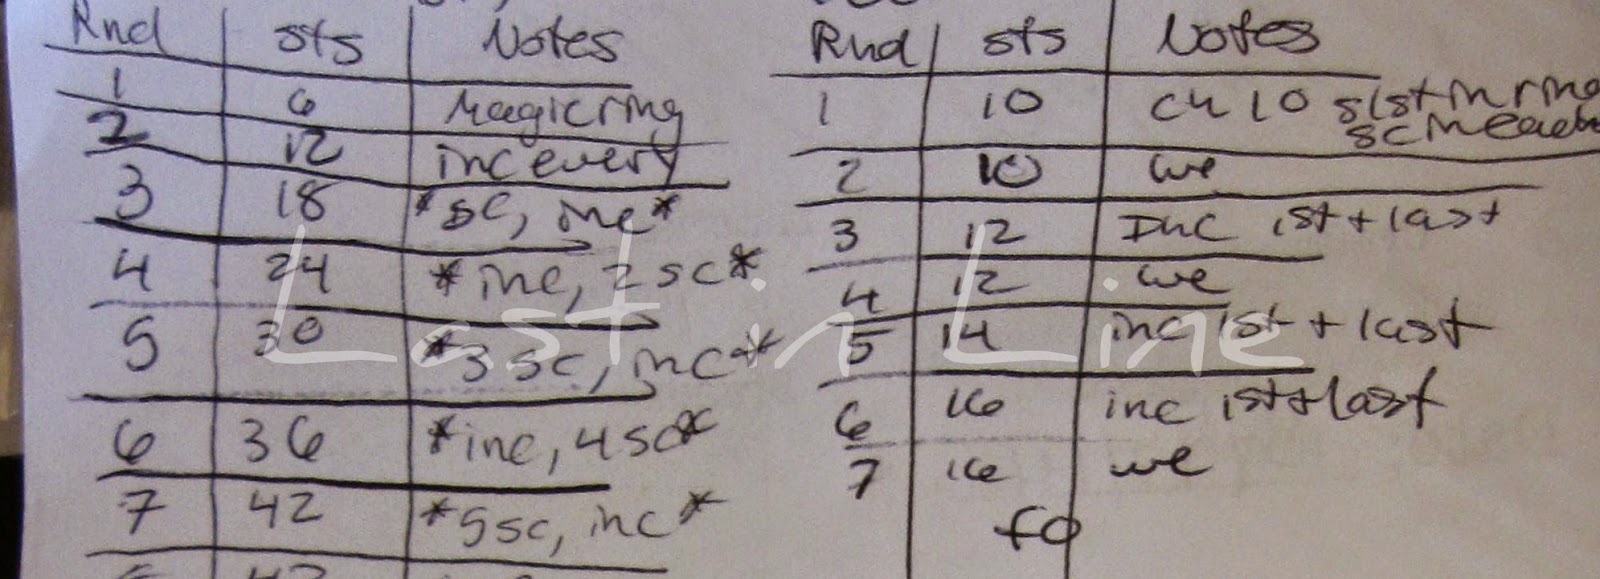
As I am crocheting, I make charts for each part of the project: head, legs, body etc. Each chart has three columns in this order: Round or Row Number (rnd), Number of Stitches (sts), and Notes. The notes section is where I jot a short hand version of the stitch sequence for that round. As you can see in the picture below, it usually looks something like, * inc, sc 4 *. That little blurb translates as, *inc, sc in next 4 sts* around. Handy, huh?

Though I write down each row as I am crocheting it, there is still a bit of going back and revising. In fact, in this last pattern, I got entirely done with the head and neck (making them one continuous piece by some tricky shaping methods) and decided it was not at all the look I wanted. I ripped back ten or fifteen rounds and started again from about the eight round of the head. I crossed that omitted section out lightly so I could still read it if I wanted to. That's the nice thing about writing as you go, you can always know exactly the patterning you tried last time but disliked. It's fun to see the pattern evolve on paper!!


Step 3: Cleaning Up & Typing
This is the step I am currently at with my newest pattern. I finish off the project, assemble it, and take some nice pictures of it. I edit the pictures and prep a word document for the pattern. I have a template saved that I use as the bare bones for all my patterns, but I need to go in and add specific material lists, stitch glossaries, and "about this pattern" sections for each new pattern I write. Once all that is done, I set to work translating my chicken scratch on paper into lovely typed words.

  Step 4: Read Through & PDF
After the pattern is typed, I do a read through. I go line by line to make absolutely sure everything adds up, is spelled right, and makes sense. Then I save the .doc as a .pdf and get ready to put it up on Etsy.

Step 5: Testing
I will admit, I do not always send my patterns away for testing. If it's a small plush or something simple, I just upload the edited PDF and call it a day. So far, nobody has contacted me about one of my untested patterns containing an error, so that's a good sign. If the project is very intricate or gi-huge-ic, I send it off for testing. I use two testers, and give them a few weeks. Once I've heard back from them and made and changes, it's off to Etsy the pattern goes!!

 So, there you have it. My writing and editing process for crochet patterns. What's your pattern-writing style? Are you able to write it all up first and THEN crochet it to test it? I'd love to hear your process.

Happy Tuesday!!   

Monday, October 27, 2014

Felting an Angora Sweater


My mom has a way of gifting me the most challenging things. I mean that in a good way. She finds things that she knows can be re-purposed, and hands them over to me to get my gears turning. A few weeks ago, while we were chatting on the phone, she mentioned she was "done" with a sweater she'd had for years.


"I took the buttons off already. Do you want it to felt?"

"What is it made of?"

"Angora, I think."

"Ohhhhh yes please."

"Okay, I'll mail it to you."


I actually forgot that she was going to mail it here, so when it arrived in the mail, I was super excited and surprised. As I mentioned before, she's had this sweater for years. It's one that I have lots of memories of her wearing. And all those snuggly/scratchy/fluffy angora hugs. The colors are so autumnal as well, which puts the sweater even higher on my "Yay" rankings. 


I popped the thing in the washer alone on the "ultra clean" hothothot setting. The first time through, it didn't felt much. So I put it back in, stuffed in a pillow case. I even put it in the dryer! Crazy. Though it did not felt down as much as I expected it would, I am very pleased with the result.


It has that beautiful halo of fiber so common of angora. I simply love it. I have a few ideas for what I'd like to do with it, but I'm just going to let my thoughts simmer for a little bit before I jump in to a project with it. I mean, it is full of sentimental value and lovely fiber. Don't want to rush in to something.

What have you felted?

Tuesday, October 21, 2014

Something I Never Thought I Would do...


These last few days have been full of activities I never really thought I would do. As you know, I debuted on Twitter yesterday which is something I never really thought I'd be into. But I did it, and now @LastinLineShop is a real-deal Tweet factory. The other major "never woulda thunk I'd be doing this" activity is drying berries.

That's right. Dehydrating dem yum-o red, red Raspberries.  Raspberries that apparently produce fruit here until it snows. Crazy! But yummy.

 
I was kind of adverse to the idea of drying fruit-type stuff. Why not just eat it all? Drying seemed like extra, silly work in my mind. Oh how wrong I was.

I found myself once again the recipient of the benevolent +Pyper Jean's produce and was a bit overrun with fruit. Which is by no means a complaint. I seriously cannot get enough raspberries. But seeing as my freezer is currently packed to the gills with other produce courtesy of my friend, I needed to either eat them all or....

...dry them.

Now, Pyper reassured me that the berries are amazingly wonderfully delicious once dried. To convince me 100%, she had me try some she had dried. I will admit, I was skeptical; but, holy moly, mother of sweet berry goodness were they delicious!! They start out tasting a tiny bit bitter, then the flavor blossoms into this deep, tart, concentrated berry bomb in your mouth. No exaggeration.

Well, maybe a little exaggeration, but they are yummy, and that's what matters.


So, thoroughly convinced that drying the fruit was the way to go, I was sent on my merry way with a dehydrator to borrow and a bucket of berries. 10ish hours later, my sweet treats were ready. Mhhhhhhh.

Who'd a thunk?

Super easy, super yummy. In my mind that's a win.

Have you ever dried berries?

Monday, October 20, 2014

New Twitter Account & How To Make: Coffee Soap


Have you ever come across an idea for a project that will not get out of your head? It just gets in your brain, takes root, and keeps itching away until you actually give in and embark on the project. It used to happen to me a lot. Read: daily. But lately, as I have been distracted by a certain little babu, my brain hasn't had too much free space for craft obsessions.

But since thing have settled in to a sweet little rhythm, my brain has been able to latch on to something: soap making. I saw an article on PopSugar about how to make soap using up old coffee grounds.

And I thought, "Well, I like coffee."


It's really super duper easy to make some fast soap. You can do it in an afternoon! To some, the melt-and-pour method of soap making is cheating because it involves using a premade soap base. In my mind, it's the safest method for me to make soap in an apartment. No lye, no fumes. Safe for baby and me! Are you sold on this? Let's get to it!!


Supplies:
Meltable clear glycerin soap (got mine from Michael's)
Old coffee grounds
Vanilla scent (optional)
Microwavable glass bowl
Spoons
Mold (I used candy making molds: $2 at Michael's) 


Step 1: Cube your wax
Most clear glycerin comes with pre-scored lines to cut 1 oz sections. For my mold I needed about 5 oz, but I cubed up 6 just to be safe.


Step 2: Melt wax
Follow the directions on your wax package for microwave melting. Mine said to start with 30 seconds, then melt and stir at 10 second intervals. 


Step 3: Add scent and coffee grounds
Just like the title says, yo. Mix in the scent and how ever much of the grounds you want. I did about 2 tbs of grounds, and 5 ish drops of the scent. 


Step 4: Pour into molds
While doing this, stir the glycerin a bit between pours to keep it from solidifying. Just make sure you don't drop your spoon into the mixture. Because it is annoying when that happens. Not that I know from experience or anything.


Once you are all done pouring your soaps, you can let the excess soap harden and save it for another pour. That's the beauty of melt and pour: you can reuse it as many times as you want! I didn't save mine because it was kind of a grounds-y mess. 


 Step 5: Wait for the soap to harden, then pop them out!
It takes about 40ish minutes, depending on the depth of your mold. You can pop them in the freezer to speed the process, but I saw no need to do that. 


Look how beautiful they look!! The pictures doesn't really do the prettiness justice. It's so deep and transparently and yummy. The soap is so great to use. It's got a great lather, and the coffee grounds are delightfully exfoliating. And the smell? Heavennnnnn.


You can spray rubbing alcohol on the bottom of your soap while it's wet to get rid of the ugly bubbles, but I didn't. These were just my practice ones. And plus the bubble side will be down when it's on the soap dish. Nobody is going to be critical. 


I can't wait to make more soap! I have so many plans for fun herb mix-ins. Have you ever tried to make soap? Cold Process? Melt and Pour?

In other news, I made a Twitter account today! Follow me! I'll follow you back. @LastinLineShop

Wednesday, October 8, 2014

Drying Herbs


 Over this summer, thanks to the ever loving and benevolent Pyper Jean, I've amassed a nice little stash of delicious herbs.

Chocolate mint
I've never dried my own herbs before, and I was under the impression that it takes tons of effort. I mean, yeah, I'll use the heck out of fresh stuff from people's gardens, but that's as far as it can go. Mostly because I was terrified of the process. I vaguely remember seeing a screen set up that required a fan and carefully timed leaf turning schedules. Yeah, you don't need any of that nonsense.

Chocolate mint dried for tea
All ya gotta do is pop those plants on a wall outside. Or inside. Or anywhere!! Lucky for me, the previous tenants in our apartment put lots of nails in the wall on our balcony: perfect for herb drying.

Sage
I dried chocolate mint, oregano, sage, rosemary, tarragon, orange thyme, lemon thyme, and regular thyme. I am so pleased to now be culinarily adept enough to be able to say to myself, "Oh I should season this with some of my home-dried herbs!"

Because I'm the only one who really feels special about it.

Well, my wallet does too. Do you know how expensive herbs are at the grocery store?? It is straight up RIDICULOUS, yo. But now, I'm not slave to the Spice Islands or  old man Mckormic anymore.

Herb gardens!!!!! For the win!!

Oregano
Have you ever dried herbs at home? What's your favorite herb?

Tuesday, October 7, 2014

On the Needles Teaser


Been a while since I've done one of these posts.
A little something simple and lovely.

Monday, October 6, 2014

Autumnal Adventures: My Seasonal Bucket List

I don't think I'm the only person who does this, but I make a mental bucket list of sorts for each new season as we go into it. Autumn, being my favorite season, has the longest bucket list. And so far, (although some of my staple activities can't be done since we live elsewhere) I've been doing pretty good a knocking things off the list this year...
 
 Make a giagantor pot of Chili


It's kind of cheating to count making chili as being crossed off my list, because it's something I don't actually do. Mr. Sailor is a chili-making fiend and refuses to allow me to help. It's "his thing" and I am completely happy reaping the benefits without having to input any of the labor. He even does the dishes after he makes it!! Well, some of them. Regardless, chili-making is only allowed to be done during the fall/winter, according to Sailor. Since he is the Chief Chili-Maker, I can't really argue.


This big pot of yum yums he made a couple weeks ago was a sure sign that, yes, fall had arrived. It's my unofficial official indication of the changing seasons. "Is Sailor in the mood to cook chili? Yes? Must be autumn."


Nature hikes to enjoy the colors


This one we've already done, too, but (like chili-making) it can happen several times through the season. In fact, I want to to happen several times, but if I get at least one good nature outing in, I'm somewhat less put out that there weren't more.


Out here, there isn't too much of the whole "massive riot of color" for the changing trees. I mean, some of the stuff changes colors, but it's not like the reds and oranges and yellows from back home. A fall nature hike here is most likely to include snow, if you go into the mountains like I am inclined to do.


Last Thursday, Ernest and I surprised Daddy by picking him up from work with a picnic already loaded in the back. We drove around some new neighborhoods and headed waaayyyy up into the canyons. We ended up taking a very, very bumpy dirt road up to the tip top of the Alta ski resort. There was a little parking area, and you could look down and see the whole canyon. It was beautiful, awesome, and chilly. But totally worth it.
SNOW!!!
I packed grilled salami and provolone sandwiches (on GF bread, for both of us), pasta salad made with gf corn pasta, garlic hummus and gf pretzels, and sugared raspberries. The icing on the cake? Homemade hot cocoa made with real dutch cocoa and delicious whole milk. I felt so fancy unpacking it all. Sailor was quite impressed with my picnic planning skillz.


Other important things on the autumnal bucket list:

Apple picking (done, a couple times, over at Pyper Jeans)
Apple doughnuts (gotta find GF ones!!)
Carve a pumpkin
Make The Best Ever Pumpkin Cookies
Campfire
 Collect some nice leaves
Decorate porch for fall
Canning and preserving (I could cross this off, but it's never really done)
Make socks
Get Pumpkin Shakes at Culver's 
See a Harvest moon (Coming up!!!)


What do you do each fall?